8 September 2014

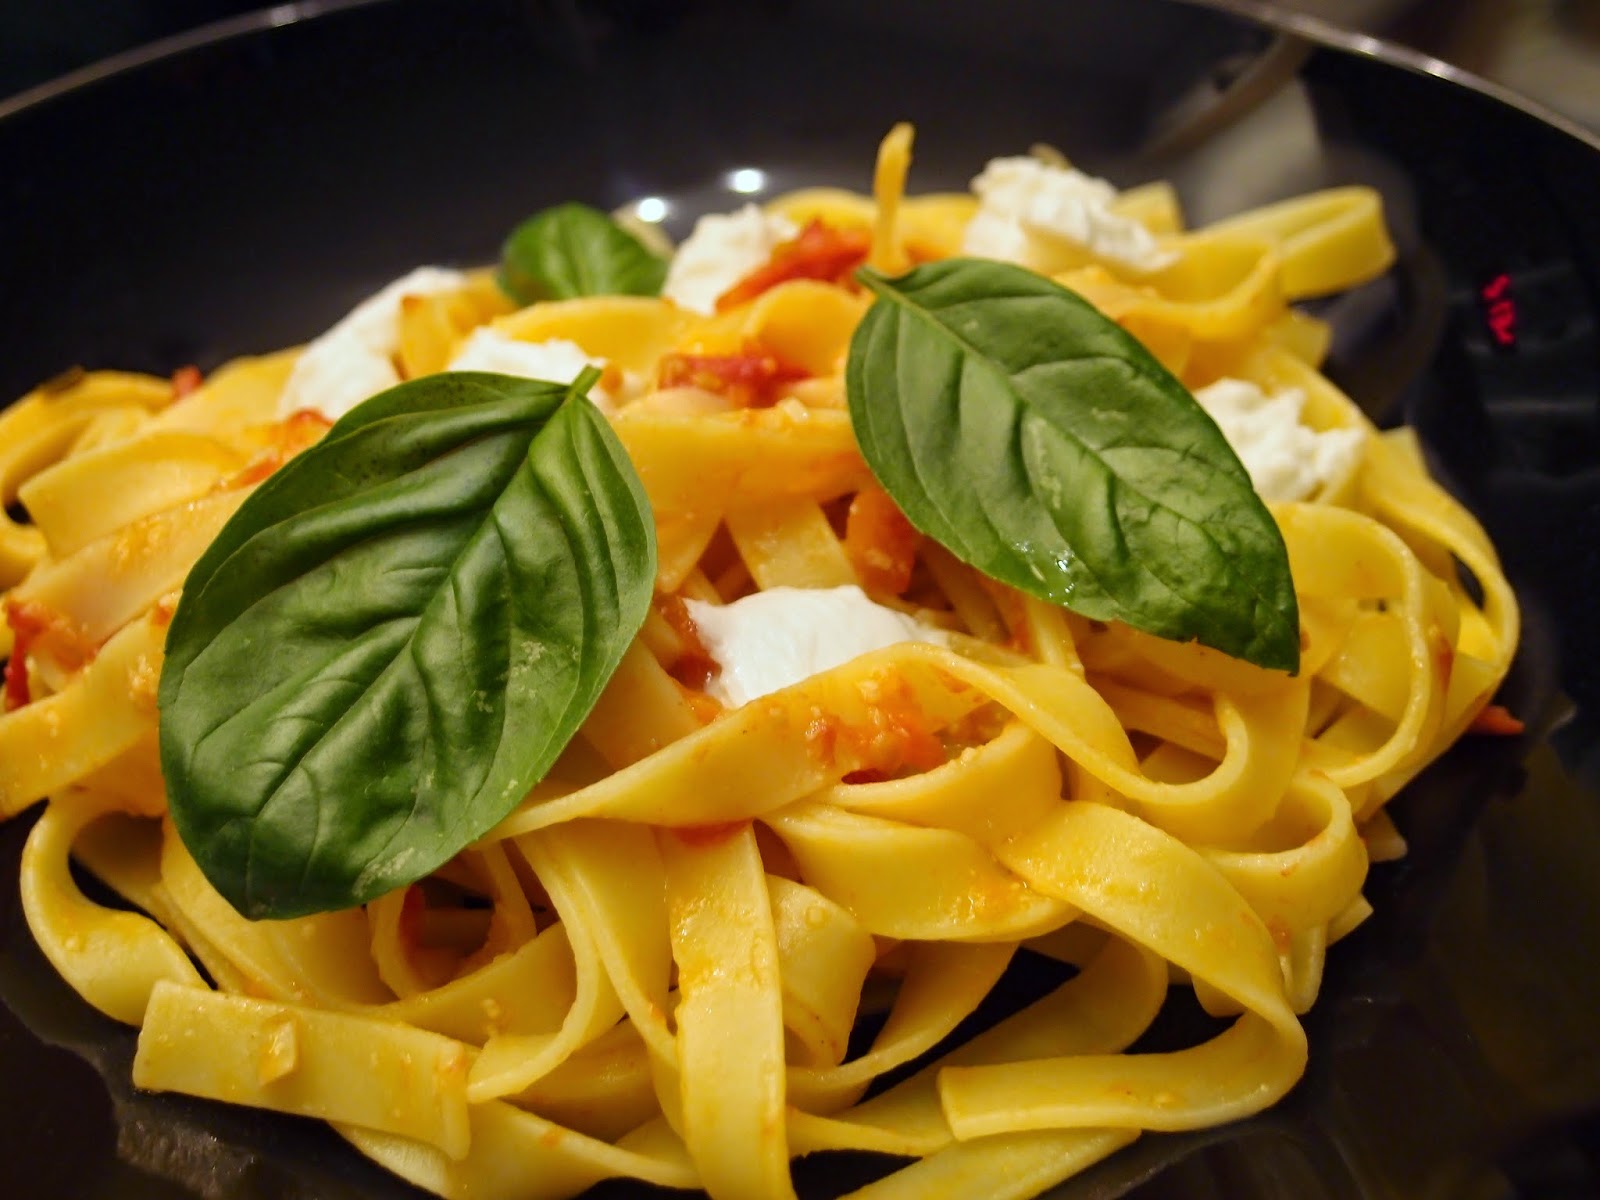
Slow-cooked tomato sauce with tagliatelle

My very productive tomato vines on the balcony, have persuaded me to cook a tomato dish again. Not that I have anything against tomatoes, quite the contrary. At the moment my vines save me quite a bit of shopping as tomatoes would always be on the shopping list. If you want to know more about my tomato growing ventures, also read yesterday's post TomatoTigerella – A love story.


So this time I decided to slow cook my sauce to make it really intense with tomato taste. I find that a tomato sauce should either be made very quickly or slow-cooked. This is how I made mine.

Ingredients

400 g tomatoes
2 garlic cloves
1 tbsp olive oil
1 tbsp basil infused olive oil
20 g vegetarian pasta cheese
Fresh basil leaves
Ground nutmeg to taste
125 g buffalo mozzarella
250 g tagliatelle


Method

Chop the garlic finely and cook it in olive oil until soft. Also chop the tomatoes and add them to the pan. Simmer the sauce under lid for at least one hour by stirring occasionally. If the sauce gets too liquid, simmer also without the lid on.

Once you are happy with how the tomato taste has developed, add the basil oil, grated vegetarian pasta cheese, basil leaves and nutmeg. You can also add salt and pepper to taste.

Boil the tagliatelle until al dente. Serve the pasta with the sauce and torn mozzarella.


Enjoy!

Your VegHog

7 September 2014

Tomato Tigerella – A love story

Would you like to have a wild guess, which of these is The VegHog's balcony? I'm sure you'll get it!


Earlier this summer my lovely reader Adi requested me to publish a photo of my whole balcony, so now I'm trying to show you in some wider shots what it looks like. Please also visit Adi's great blog Vegetarian Courtesy, where she writes about vegetarianism, food, environment, animals and more. 

So, in case you've missed my previous praise for the cute stripy Tomato Tigerella that I am growing this year, here comes more.  


I'm so proud of how well the Tomato Tigerella vines have done. I guess weather wise it was quite a good summer, too. Earlier this year I was planning to plant bush tomatoes like last year, which are bit more suitable for balcony growing. The fascinating looks of the Tigerella however got me distracted and I realised only when it was too late that they actually were vine tomatoes. Luckily the growth is slower now and they shouldn't get much taller. Besides there's still a little bit room before they reach the upstairs neighbour's balcony.


I've already harvested and cooked loads of the tomatoes and there still are so many more. Do you have any good suggestions what I should cook with them next? Tomorrow I'm going to post a recipe cooked with these tomatoes, but I need more ideas, and would be very grateful for any input. I will also soon post an update on my other balcony plants.

Your VegHog

5 September 2014

Spinach, garlic and pine nut pasta salad


September has started really warm here in southern England. That means I'm having a small break from all the roasted vegetable dishes, pies etc. and making just a fresh pasta salad today. This is an ideal lunch to take with you to work or studies, I find. This is also an easy one to variate depending on what you have in your cupboards. Have a look!

Ingredients

250 g farfalle pasta
100 g spinach
2 garlic cloves
2 tbsp olive oil
40 g pine nuts
30 g vegetarian pasta cheese
A few fresh basil leaves
Salt
Ground black pepper
Grated nutmeg

Method

Boil the pasta soft. I normally boil it a little bit softer than I would for a warm bowl of pasta. Otherwise when cooled, the pasta might be too firm. After boiling rinse the pasta with cold water and drain.

Chop the garlic finely and cook it soft in one tablespoon olive oil. Add the spinach and one or two tablespoons water and wilt the spinach. This takes only a few minutes. Let the pan contents cool.

Toast the pine nuts in the oven or on a dry pan.

Combine the pasta with the spinach garlic mix and the pine nuts. Season the salad with the rest of the olive oil, fresh basil leaves, salt, ground black pepper and grated nutmeg. Grate the vegetarian pasta cheese and add it to the salad.


Done!

Your VegHog

4 September 2014

Potato and spelt flatbreads with walnut pesto and roasted courgette


I made some potato and spelt flatbreads filled with walnut pesto, roasted courgette and salad fixings. It was quite the ultimate bread and it was filling enough to be had as the main meal of the day. Making these requires a little bit of effort as bread baking is involved. However these flatbreads are pretty much the easiest kind of breads that you could be baking. And isn't it so nice to have fresh homemade bread? This huge yellow courgette grew in my garden, and now it was time to get rid of it. It was still surprisingly firm considering its size, it hadn't gone yet quite a marrow.


Potato bread is very nice tasting and can easily be made from left over potato mash. The walnut pesto adds a crisp, sharp taste to it and the roasted courgette and other vegetables are just full of freshness. Here is how I made my breads.

Potato flatbreads

500 g potatoes
1 egg
1 dl spelt flakes
2 dl barley flour
1 tsp salt

This recipe makes 2-3 large flatbreads.

Peel the potatoes and boil them until soft. Then chase them through a potato ricer or just mash them as usual and let cool.

Add a little water to the spelt flakes to moisten them, but pour any excess water off that they aren't absorbing.

Then add the egg to the potatoes and stir. Also add the spelt flakes, barley flour and salt and knead until the dough is even.

Shape large flatbreads of the dough and place them on a baking paper. These should be rolled out quite thinly.

Stab with a fork on the top of the breads and bake them at 200C for about 20-30 minutes until they have received brown marks.


Walnut pesto

50 g walnuts
1 garlic clove
80 g fresh rocket
5 tbsp olive oil

Pulse all ingredients together with a hand mixer and let cool in the fridge. This pesto will be later spread on the flatbreads.

Topping

1 large courgette
2 tbsp olive oil
1 tsp oregano
3 spring onions
3 tomatoes
Fresh rocket
50 g Sussex Charmer cheese


Roast the courgette slices at 220C for about 20 minutes brushed with olive oil and oregano. Turn them a couple of times during the roasting. They should still be a little bit firm, so don't roast them for too long. At least that's the texture that I like more.

Chop the spring onions and cut the tomatoes into slices. Also cut small pieces or make shavings of the cheese.

Assemble the breads by spreading the pesto on the bread and then layering all the ingredients onto it. You can enjoy them either open or closed.


Your VegHog

3 September 2014

Roasted harlequin squash and courgette pie


So the squash season is well under way, and of course I've already been purchasing some and planning new recipes with them. I really love this season and can't wait to cook more with these fine ingredients. I'm very excited to share more autumnal recipes with you. I think I'll need to visit a large farmers' market soon to get many different kind of squashes.

The cute harlequin squashes have also appeared to the shops, so I made this cheesy pie with roasted harlequin squash and courgette, which was very well received by my eaters. Courgettes are summer squashes after all, and this one was produced in my own garden, which is always lovely. The harlequin squash and courgette tasted really good together, especially with the herb savory in the pie.


You can make either one large pie or several smaller pies with these ingredient amounts. Of course there's more fiddling with the pastry involved, if you choose to make small ones. I was lazy this time and bought a ready made and even readily rolled out pastry.

Ingredients

1 harlequin squash
1 courgette
200 g potatoes
2 shallots
3 garlic cloves
Olive oil for roasting and frying
Handful of fresh savory
Ground black pepper to taste
Salt to taste
500 g shortcrust pastry
250 g extra mature cheddar
1 egg

Method

Cut small cubes (about 1,5cm x 1,5cm) from the squash, courgette and potatoes. Place the vegetable cubes into a roasting tin and brush them with olive oil. I put each vegetable type into their own tins, because the roasting length can vary for the different vegetables. Turn the veg occasionally during the roasting and roast them at 200 C for roughly 25 minutes until they are soft with roasting marks.

Coarsely chop the shallots and finely the garlic and cook them in olive oil until soft. Add the roasted vegetables to the pan and season the pie filling with fresh savory, ground black pepper and salt.

Roll out shortcrust pastry thinly and place it into a pie dish. Cut off the excess pastry on the sides and cut a lid of suitable size. I made again some nice hedgehog and mushroom decorations for the top from excess pastry.


Fill the shortcrust pastry with the filling and cheese. Put a layer of the filling and then cheese onto the pastry, and repeat until the pie dish is full. Then close the lid and brush the pastry with a beaten egg and make a couple of breathing holes into the lid.

Bake the pie at 180C for about 30 minutes until the pastry is baked crispy and golden brown. A larger pie might need a longer baking time.


I hope you'll enjoy the squash season as much as I do! There will be many recipes to follow.

Your VegHog

2 September 2014

Pepper fritters


It's about time for a new fritter recipe by me. You know how fond I am of veggie fritters, and I have now developed a new recipe. These fritters can be served as burgers just as well, but this time I combined them with salad and roasted potato wedges. Have a look how these are made.


This recipe makes about 12 fritters.

Ingredients

2 red bell peppers
1 carrot
1 shallot
1 garlic clove
50 g mature cheddar
1 egg
4-8 tbsp spelt flour (or wheat flour)
1 tsp Herbes de Provence
½ tsp salt
½ tsp ground black pepper
Vegetable oil for frying

Method

Grate the bell peppers, carrot and cheese.

Chop the shallot and garlic finely.

Mix all ingredients in a bowl into a fairly firm dough.

Add more flour if needed for the binding.

Fry the fritters in vegetable oil on both sides until golden brown.

This is how easy it is!


Enjoy!

Your VegHog

1 September 2014

Harissa and spelt stew


September is here! I'm quite excited about all the lovely autumn dishes that I can cook now and I hope you are too! I had a small break from posting in the end of last month, but now I'm very motivated to post, cook and eat a lot.

Today I'll start with a savoury and spicy dish just to kick things off for the month. I cooked an autumnal dish with the feel that I really appreciate in this season. I used harissa, which is such a handy thing to have around and it goes oh so well with halloumi. Have a read what a simple dish this is, only a bit of slow-roasting needed.

Ingredients

4 red bell peppers
4 large shallots
2 tbsp olive oil
250 g cherry vine tomatoes
250 g halloumi
1 tsp vegetable oil
4 garlic cloves
1 cup pearled spelt
500 ml vegetable stock
3-4 tsp harissa
1 tsp ground cumin
1 tsp honey
1 tsp paprika
½ tsp thyme


Method

Chop the peppers and shallots coarsely and brush them with olive oil. Roast at 180C for about 40 minutes and then also add the tomatoes to the dish and roast for further 30 minutes.

Chop the halloumi into cubes and fry the cubes golden brown. Set them to side to wait until later.

Chop the garlic finely and cook it in olive oil. Then add the pearled spelt to the pan, soon followed by the roasted vegetables. Stir and add ground cumin, harissa and half of the vegetable stock to the pan and let simmer under the lid until the spelt is cooked nicely.

Add more vegetable stock when needed. You might not need all of it depending on the moistness of the dish. Season with honey, paprika and thyme and taste, whether more harissa or cumin is needed. Add the halloumi dices and let simmer for further 5 minutes.


Serve warm and enjoy!

Your VegHog